Congratulations! You are a few short steps away from integrating Intacct with your organization's Emburse Professional account, saving you countless hours of manual effort and administration.
To ensure a seamless implementation, please complete the following steps before attempting to connect both systems. Completing these steps ahead of time will simplify the onboarding process.
Get Started in Intacct Before Connecting
The following actions will need to be completed prior to connecting your Intacct instance to your organization’s Emburse Professional account. Log in to Intacct as an Administrator and complete the following tasks.
1. Create a Web Services User and Authorize the EmburseMPP Sender
Estimated Effort: 5 minutes
We use web services to connect your Intacct account with your Emburse account.
Follow this step-by-step guide to generate the web services user and authorize the EmburseMPP sender: Connect Your Intacct Account to Emburse.
2. Select the Employees or Vendors to Sync to Emburse
Estimated Effort: 10 minutes
The Emburse Intacct Connector will automatically create user records in Emburse, based on the active Employees or Vendors in your Intacct instance. Additionally, the connector will modify the user records in Emburse if a change is made in Intacct, such as changing a user’s name or default Department.
By default, if you enable either the Employee sync or the Vendor sync (or both), all active employees/vendors will sync to Emburse. If you would prefer to only sync a subset of your employees or vendors to Emburse, you may create a filter in Intacct. Use this guide to control which employees or vendors synchronize to Emburse: Select Intacct Employees to Sync to Emburse.
3. Create Emburse Roles for Intacct Employee or Vendor Records
Estimated Effort: 10 minutes
In order for an employee or vendor record to synchronize to Emburse Professional as a user, an Emburse role must be assigned to each record. Emburse Professional offers four different user role types, each with its own set of permissions and access.
Use this guide to create a custom role field in Intacct and assign roles to your employee or vendor records prior to synchronization: Create Emburse Professional User Roles in Intacct for the Emburse Intacct Connector.
4. Apply Supervisor and Department Fields to Vendor Records
Estimated Effort: 10 minutes
Organizations that have their employees configured as vendors within Intacct will need to add two custom fields to their vendor records:
- An Approver field, which will map to the First Approver field in Emburse Professional
- A Department field, which will map to the Department field in Emburse Professional
Both fields are required in order to synchronize a vendor to Emburse as a user.
Additionally, custom fields can be created for Class and Location, if your organization leverages those.
Create the Approver Field
1. Select Applications > Customization Services > Custom Fields.
2. Under Choose Object to Extend > Object, select the Vendor object.
3. Under Choose Field Data Type > Data Type, select Picklist.
4. Enter the following information.
- Set the Label to "Emburse Approver" or something similar.
- List the Employee IDs or Vendor IDs of the Intacct employees/vendors who will need to be set as approvers for other users in Emburse.
- The users listed here will also need to be synchronized to Emburse as users in order to be approvers for other users.
- The Field ID will be generated automatically. This ID will be used when configuring the integration in a future step.
- Enter an optional Description.
5. Choose whether the field is required and customize where it will appear on the Vendor record. Then click Done.
You will now see the field on your vendor records in Intacct. Be sure to assign an approver to each vendor record you plan to sync to Emburse.
Create the Department Field
Similar to the Approver field, we must create a custom field, populated with values from your Intacct Department list, to assign to vendors who will be synchronized to Emburse as users.
1. Select Applications > Customization Services > Custom Fields.
2. Under Choose Object to Extend > Object, select the Vendor object.
3. Under Choose Field Data Type > Data Type, select Picklist.
4. Enter the following information.
- Set the Label to "Emburse Department" or something similar.
- In the Pick Values text box, list the Department ID values from your Intacct Department list.
- The Field ID will be generated automatically. This ID will be used when configuring the integration in a future step.
- Enter an optional Description.
5. Choose whether the field is required and customize where it will appear on the Vendor record. Then click Done.
You will now see the field on your Vendor records in Intacct. Be sure to assign a Department to each vendor record you plan to sync to Emburse.
Create the Class and Location Fields (Optional)
If your organization leverages the Class and/or Location fields in Intacct and you wish to synchronize a default Class/Location value to your vendor users in Emburse, repeat the steps above to create a custom field for each object.
Similar to the Department custom field, the Pick Values entered must be the Internal ID values from your existing Class or Location objects.
5. Assign Values to Each Employee or Vendor Record
Estimated Effort: 10 minutes
With all of the necessary fields created in Intacct, it is time to assign values to your employee or vendor records to ensure the records synchronize to Emburse without issue.
For organizations whose users are created as employees in Intacct, open the employee record of each user who will need access to Emburse and ensure the following fields are populated with applicable values:
- Sync to Emburse box is checked (if your organization plans to send a subset of users to Emburse)
- Emburse Role (Custom Field)
- Department
- A Manager is assigned to the employee (the manager must also sync to Emburse as a user)
- The employee record is active and has an Email Address, First Name, and Last Name
For organizations whose users are created as vendors in Intacct, open the vendor record of each user who will need access to Emburse Professional and ensure the following fields are populated with applicable values:
- Sync to Emburse box is checked
- Emburse Role (Custom Field)
- Department (Custom Field using the Department list created in a previous step)
- Approver (Custom Field created in a previous step)
- The Vendor record is active, set as an Individual-type Vendor, and has an Email Address, First Name, and Last Name
6. Create Expense Types in Intacct
Estimated Effort: 10 minutes
The Emburse Intacct connector will import your expense types from Intacct into Emburse for use on expense reports. Additionally, the expense categories selected on Emburse Professional expense reports will export back to Intacct and map expenses to the appropriate expense account, to ensure accurate reconciliation.
1. To review your expense category list in Intacct, select Applications > Expenses > Setup > Types.
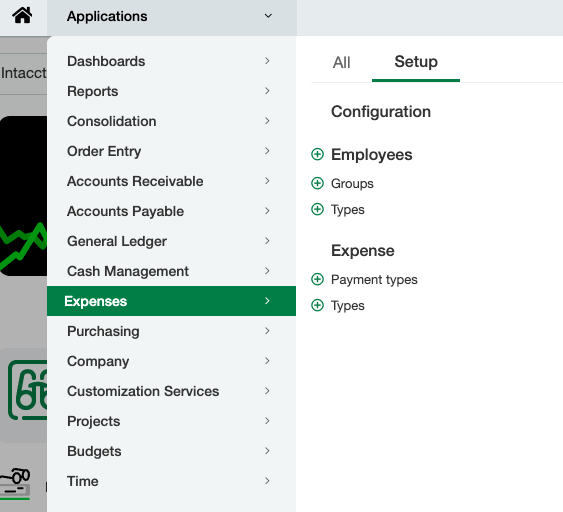
Any categories listed here will import to Emburse Professional and can be selected by end users when creating an expense report.
2. If no categories exist, select Add to create new categories.
3. Enter the Expense Type Name, select an Account Number to which the expense category will be linked, and enter such optional data as Description or Offset Account Number.
- Expense Type: This will be the name the user sees when selecting an expense category in Emburse Professional. Typical expense category names include Airfare, Hotels/Lodging, Breakfast, Lunch, Dinner, and Office Supplies. You may create as many expense categories as needed.
- Account Number: Select the GL account number which best aligns with the expense category. Mapping to an account number ensures the transactions submitted in Emburse Professional reconcile to the appropriate general ledger account in Intacct.
Active expense types will import to Emburse Professional during your first scheduled synchronization, which will be completed in a later step.
Steps to Take in Emburse Professional
There are a few settings in Emburse Professional that, if enabled, will greatly improve your experience with Intacct and limit any potential expense report export errors. Follow the steps below to configure your Emburse Professional account for maximum integration efficiency.
7. Prevent Negative Expense Report Totals
Intacct does not allow expense reports with a negative expense report total. While it is unlikely that an employee would submit a negative report through Emburse Professional, it remains possible. To account for this, validation can be added to your organization’s Emburse Professional account to prevent the submission of negative expense reports.
Reach out to our Support team and request that validation be added to your account to prevent negative expense reports from being submitted.